Password Protect .pfx File

This is a short blog post for a use-case I encounter a lot.

In Azure, we can use service principals with certificate for authentication. One of the pre-requisite for this private certificate is a password protected .pfx file. A lot of times, the .pfx file is provided to you by a different certificate authority or access management team and it is not password protected. The MS documentation provided a way to use OpenSSL to achieve this but I prefer PowerShell and below is a simple script which helps you do the same.

You do not require admin rights or anything extra installed to run this script in your local environment.


$ErrorActionPreference = "Stop"
#Name of pfx file that needs to be password protected with extension
$pfxFileName = Read-Host -Prompt 'Input pfx file name'
if($pfxFileName) {
#Replace .\ with actual path where .pfx is stored. Do not include file name
$pfxFilePath = (Get-Item -Path ".\").FullName
$certCollection = New-Object System.Security.Cryptography.X509Certificates.X509Certificate2Collection
$certCollection.Import("$pfxFilePath\$pfxFileName", $null,[System.Security.Cryptography.X509Certificates.X509KeyStorageFlags]::Exportable)
$password = Read-Host -Prompt 'Enter password for file'
$protectedCertificateBytes = $certCollection.Export([System.Security.Cryptography.X509Certificates.X509ContentType]::Pkcs12, $password)
# New pfx will be generated at same location where existing pfx is with the following name PW-protect-{same}
[System.IO.File]::WriteAllBytes("$pfxFilePath\PW-protect-$pfxFileName", $protectedCertificateBytes)
Write-Host "Operation Completed"
}
#Ref: https://www.powershellbros.com/export-keyvault-certificates-azure/

Hope this helps!

Reference: How to export KeyVault certificates from Azure?

Self Hosted Runner in Azure Container Instances

A lot of times there is a requirement to use self-hosted agent for deployments instead of the vendor provided one. The usual approach to achieve this is by using VMs with agents hosted on it. But VMs come with lots of maintenance and update/patch nuisances, not to mention more development and deployment time. MS documentation provides one more option i.e. to host your agent in containers. The documentation is quite good for DevOps agent and can be found here

Unfortunately the documentation on achieving the same in self-hosted github runner is not very great. Since I was using github runners, I tried to achieve the same using github runners. After few days of work, finally it works.

The complete source code can be found in the github repo and is based on Linux (not Windows) – https://github.com/garima2510/self-hosted-runner-azure-containers

Jumping into bit more details, below are some steps as well as issues I encountered and how I fixed it:

  1. Deploy Azure Container Registry:
    Since I wanted to use private registry and not public, the first step was to deploy an azure container registry. Off course, this will use github hosted runner to run. The repository contains the bicep code and github action to deploy ACR. I deployed with admin access enabled so that I can build and publish images via github actions and admin credentials helped me to login to the registry. As far as I know, registry needs to be public i.e. not protected by private endpoints for github hosted runner to access itACR
  2. Build and publish image:
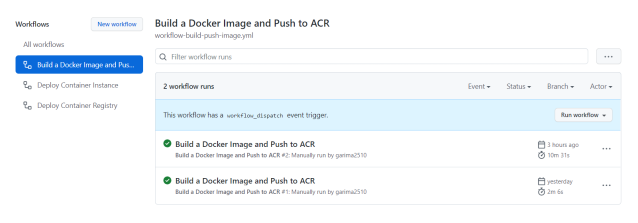
    This step proved to be a tricky one as I needed a docker file which will install the github agents and Azure CLI both on it when a container is created. MS docs manages the AZ CLI part but not the github agent part. Finally combining the MS docs with code present in this repo, I was able to create a docker file which achieves this. The repository has the dockerfile and the github action that builds the image and then pushes it to the ACR created in step 1deploy-image
  3. Deploy Azure Container Instance:
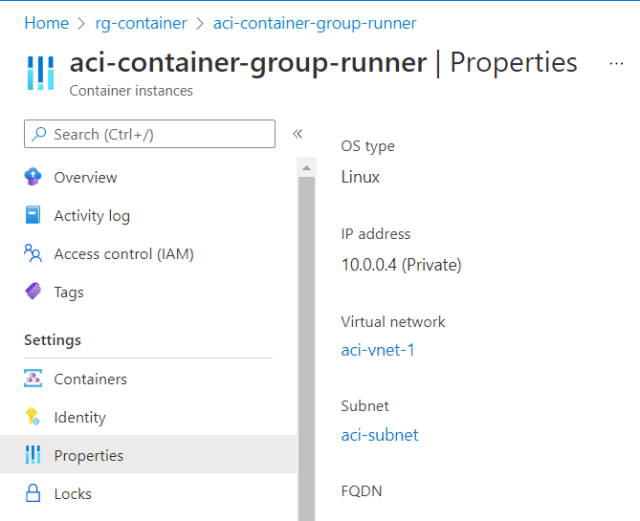
    Finally, create container instances with the published image. I created the ACI inside a virtual network to make it more secure. Later on, I was able to run the github actions on this agent to deploy securely to Azure
    One thing to note here is, I decided to use bicep again to deploy ACI but there is one more way i.e. `Azure/aci-deploy@v1` github action. I didn’t use it as it does not support deploying ACI in virtual networks at the time of writing this article.
  4. Check GitHub Runner
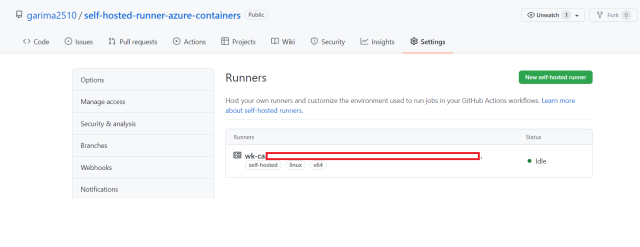
    Once the container is created, your github repository will show the self hosted runner up and running.

P.S. Github recommends to use self-hosted runner in private repositories only. The above screenshots are for demo purpose and the complete set-up was deleted afterwards.

For more details on the exact set-up check the repository read me file

Links the were helpful:

Hope this helps!

Asynchronous Refresh of AAS Model using PowerShell

With the introduction of REST API to refresh the analysis services model, we can now perform asynchronous data refresh operations. This also includes synchronization of read-only replicas for query scale out.

Some of the pros of using this approach is:

  1. Since the requests are asynchronous, there is no need for long running HTTP connections
  2. In response we get a operation id which can be used to query the status of the job
  3. In-built functionality for auto-retries
  4. Multiple table/partition names can be passed so that only that part is refreshed
  5. Batch Processing is supported using the “CommitMode” parameter

More details of the API can be found here, which includes the permissions required to make the calls along with detailed info of all the parameters:

https://docs.microsoft.com/en-us/azure/analysis-services/analysis-services-async-refresh

As mentioned in above documentation, you need a valid access token to make this call. The PowerShell to get that token via certificate auth or via client id/secret can be found here. The code works perfectly, just make sure to use the correct scope which in this case is: https://*.asazure.windows.net/.default. Also the user or application making the call should be server admin on the AAS.  The code is quite simple afterwards (used azure functions for the below):


using namespace System.Net
# Input bindings are passed in via param block.
param($Request, $TriggerMetadata)
# Init defaults
$status = [HttpStatusCode]::BadRequest
$ErrorActionPreference = "STOP"
$RequestBody = $Request.Body
if (!$RequestBody) {
Push-OutputBinding -Name Response -Value ([HttpResponseContext]@{
StatusCode = $status
Body = "Please pass a valid body in the request's body."
})
}
else {
# Retrieve AAS details from request body
$AnalysisServerName = $RequestBody.AnalysisServerName
$AnalysisServerLocation = $RequestBody.AnalysisServerLocation
$ModelName = $RequestBody.ModelName
$AASObject = $RequestBody.AASObject
#check if AASObject is empty or not. Irrespective of documentation
#We need Refresh Type for a call as mandatory param
if (!$AASObject -or ($AASObject.Count -eq 0)) {
$AASObject = @{
'Type' = 'Full'
}
}
Connect-AzAccount
try {
$analysisServerResource = Get-AzAnalysisServicesServer -Name $AnalysisServerName
Write-Output "Fetching access token to refresh the model"
#fetch access token which will be used to refresh the models
$Output = New-Object -TypeName hashtable
Get-AccessToken -Output $Output #fetch access token using the PS here https://adamtheautomator.com/microsoft-graph-api-powershell/
#request body to be sent to AAS REST API
$jsonBody = $AASObject | ConvertTo-Json;
Write-Output "The body of the REST API call to refresh the model is"
Write-Output $jsonBody
$uri = "https://$AnalysisServerLocation.asazure.windows.net/servers/$AnalysisServerName/models/$ModelName/refreshes"
Write-Output "Invoking POST $uri"
#$Output.AuthHeaders follows the following format
#$Output.AuthHeaders = @{
#'Content-Type' = 'application/json'
#'Authorization' = "Bearer " + access_token
#}
$PostSplat = @{
Method = 'POST'
Body = $jsonBody
Uri = $uri
Headers = $Output.AuthHeaders
}
$results = Invoke-RestMethod @PostSplat
Write-Output $results
$status = [HttpStatusCode]::OK
Push-OutputBinding -Name Response -Value ([HttpResponseContext]@{
StatusCode = $status
Body = $results
})
}
catch {
Write-Output "Exception was thrown. Details below."
$_
Push-OutputBinding -Name Response -Value ([HttpResponseContext]@{
StatusCode = $status
Body = $_
})
}
}

The $results includes an operationId which can be used to make a GET call to fetch status of the operation. The payload for the above API looks similar to:

{
“AnalysisServerName”: “analysisservername”,
“AnalysisServerLocation” : “northeurope”,
“ModelName”: “adventureworks”,
“AASObject”: {
“Type”: “Full”,
“CommitMode”: “transactional”,
“MaxParallelism”: 2,
“RetryCount”: 2,
“Objects”: [
{
“table”: “DimCustomer”,
“partition”: “DimCustomer”
},
{
“table”: “DimDate”
}]
}}

If no “Objects” are specified above, the whole model is refreshed.

Also note, that only one request is accepted per model. If there is already an operation running and another is submitted, server will return 409 Conflict HTTP Status Code. Therefore, the return result is very important as we can use the id to query the status of the already running operation.

If you want to sync the new data with replicas for query scale-out, you need to make a POST request to the /sync endpoint separately. The above code for all the operations remain the same except the different in $uri and request body.

Hope this helps!

Happy Coding!

Managing Azure VM Diagnostics Data in Table Storage

Windows Azure Diagnostics (WAD) data is stored in table storage of a storage account. There are many types of tables to store different kind of Azure Windows VM diagnostics data and some of them are mentioned below:

  1. WADMetrics*: Used to store metrics data. It follows a proper naming convention whose details can be found here
  2. WADDiagnosticInfrastructureLogsTable: stores diagnostics infrastructure data
  3. WADWindowsEventLogsTable: Stores event logs data
  4. WADPerformanceCountersTable: stores performance counters data

The issue is we don’t have any mechanism to apply retention policy to these tables or any way to directly delete the data. With time, the data grow exponentially and eventually you pay for all of it. As of August 2019, you have to manually delete the old data/tables. Now there are two ways to do it:

  1. Delete the tables altogether: This is simple and Azure re-creates them to store more WAD data. But the issue is, if your table has millions of records (like mine) it might take few days to delete the table completely. And during this time, any attempt to re-create the table will throw an error. So if your VM is writing constantly to these tables, not a good option
  2. Partially delete the data: Even though it is cumbersome and required writing custom code, I found this better. Basically you can run this code on schedule to delete all the data that is more than a month old (or any time frame). But notice, that you pay for all the operations including deleting the data, even though the cost is very low.

So I decided to go with the approach of making a utility to delete all the data that was more than a month old from logs and performance counters table. But for metrics table, since these tables are created thrice per month, every month, hence I deleted the tables more than 2 months old.

Below is the code to achieve this in normal console application, which you can use as web job too. Install “WindowsAzure.Storage” for it to work.

Delete All Metrics Tables more than two months old:

You have to run the below code twice for PT1H and PT1M tables. Also if your storage account has older data than current year’s, run the code for previous years too by looping through all the years (instead of months)


using System;
using Microsoft.WindowsAzure.Storage;
using Microsoft.WindowsAzure.Storage.Table;
using System.Threading.Tasks;
using Microsoft.Extensions.Configuration;
/// <summary>
/// delete old metrics table both PT1H and PT1M
/// </summary>
/// <param name="tablepPrefix">WADMetricsPT1HP10DV2S and WADMetricsPT1MP10DV2S</param>
/// <returns></returns>
private async Task DeleteOldTables(string tablepPrefix)
{
try
{
string connectionString = ConfigurationManager.ConnectionStrings["StorageAccountConnectionString"].ConnectionString;
CloudStorageAccount cloudStorageAccount = CloudStorageAccount.Parse(connectionString);
CloudTableClient cloudTableClient = cloudStorageAccount.CreateCloudTableClient();
TableContinuationToken token = null;
do
{
string currentYear = DateTime.Now.ToString("yyyy");
int currentMonth = Convert.ToInt32(DateTime.Now.ToString("MM"));
for (int i = 1; i < currentMonth – 1; i++)
{
string currentTablePrefix = tablepPrefix + currentYear + i.ToString("d2"); //convert single digit month to two digit
var allTablesResult = await cloudTableClient.ListTablesSegmentedAsync(currentTablePrefix, token);
token = allTablesResult.ContinuationToken;
Console.WriteLine("Fetched all tables to be deleted, count: " + allTablesResult.Results.Count);
foreach (CloudTable table in allTablesResult.Results)
{
Console.WriteLine("Deleting table: " + table.Name);
await table.DeleteIfExistsAsync();
}
}
} while (token != null);
Console.WriteLine("Old Tables Deleted");
}
catch (Exception ex)
{
Console.WriteLine("Exception occured while deleting tables " + ex.Message);
}
}

Delete logs data more than x days old:

You have to run the below code for all the storage logs table (Infrastructure, Events, Performance etc.)


using System;
using Microsoft.WindowsAzure.Storage;
using Microsoft.WindowsAzure.Storage.Table;
using System.Threading.Tasks;
using Microsoft.Extensions.Configuration;
/// <summary>
/// code to delete data from logs table
/// </summary>
/// <param name="numberOfDays">days before which all data should be deleted</param>
/// <returns></returns>
private async Task DeleteOldData(int numberOfDays)
{
string connectionString = ConfigurationManager.ConnectionStrings["StorageAccountConnectionString"].ConnectionString;
CloudStorageAccount cloudStorageAccount = CloudStorageAccount.Parse(connectionString);
CloudTableClient cloudTableClient = cloudStorageAccount.CreateCloudTableClient();
CloudTable cloudTable = cloudTableClient.GetTableReference("WADPerformanceCountersTable"); //do this for all other logs table too
//https://gauravmantri.com/2012/02/17/effective-way-of-fetching-diagnostics-data-from-windows-azure-diagnostics-table-hint-use-partitionkey/
string ticks = "0" + DateTime.UtcNow.AddDays(-numberOfDays).Ticks.ToString(); //calculate number of ticks for required date for faster query
TableQuery<TableEntity> query = new TableQuery<TableEntity>().
Where(TableQuery.GenerateFilterCondition("PartitionKey", QueryComparisons.LessThanOrEqual, ticks));
Console.WriteLine("Deleting data from " + cloudTable.Name + " using query " + query.FilterString);
TableContinuationToken token = null;
try
{
do
{
Console.WriteLine("Fetching Records");
TableQuerySegment<TableEntity> resultSegment = await cloudTable.ExecuteQuerySegmentedAsync(query, token);
token = resultSegment.ContinuationToken;
Console.WriteLine("Fetched all records to be deleted, count: " + resultSegment.Results.Count);
foreach (TableEntity entity in resultSegment.Results)
{
Console.WriteLine("Deleting entry with TimeStamp: " + entity.Timestamp.ToString());
TableOperation deleteOperation = TableOperation.Delete(entity);
await cloudTable.ExecuteAsync(deleteOperation);
}
} while (token != null);
Console.WriteLine("Entities Deleted from " + cloudTable.Name);
}
catch (Exception ex)
{
Console.WriteLine("Exception occured while deleting data from table " + cloudTable.Name + " " + ex.Message);
}
}

You can use the above to delete data incrementally on a schedule (via web job, azure function etc) or deleting all of the old data.

P.S. Cloud Table Client uses default exponential retry policy which you can change too. If you do not want to use any retry mechanism, make sure to set it to none. Good thing is, you can set retry policy to a particular action (like Delete) instead of table client in all. For this check implementing retry policies

Hope this helps! Happy coding!

References:

  1. Effective way of fetching diagnostics data from Windows Azure Diagnostics Table
  2. Understanding Windows Azure Diagnostics Costs And Some Ways To Control It

Using MIP SDK in SharePoint – II

This post is in continuation with how to use MIP SDK in C#. Please go through it first to cover some basic concepts like, setting up your system, nuget required for MIP and registering Azure AD app which will be used in the code below too.

My case scenario was to analyze a protected file present in SharePoint Document Library and set/remove protection on it depending on the contents of the document. In case you are not aware, we can use Azure Information Protection or Unified Labeling in SharePoint too. It’s pretty straight-forward and more details can be found here.

In comparison to the code I uploaded on git, there are few basic changes for using MIP SDK in Provider Hosted add-ins. Instead of relying on file path, we will use file stream from SharePoint and similarly, upload that stream back to SharePoint. I am assuming that you all are aware of provider hosted add-ins and have gone through the part one of this post. I am listing the changes below while rest of the stuff remains the same.

  1. Create a provider hosted add-in using Visual Studio. I have used SharePoint Online and MVC template for my work
  2. In AppManifest.xml give proper permission to access libraries of your target site collection
  3. Now coming to HomeController, InvokeMIP method, the first difference is how will we get tenant id of our host web. Instead of finding it in Claims, we will get it using TokenHelper’s method GetRealmFromTargetUrl
  4. Apart from this, we will create SharePoint context to get file stream of the uploaded file where we need to perform MIP operations
  5. Using this stream, MIP file handler will be created
  6. The output will be collected in memory stream
  7. Output Stream will be used to upload the changed document back to SharePoint (For more details on how to upload large files in provider hosted add-in, check this post here)

The complete code will look like below:


private void InvokeMIP()
{
//this client id is for Azure AD app and NOT of SharePoint app
private static readonly string clientId = ConfigurationManager.AppSettings["ida:ClientId"];
private static readonly string appName = ConfigurationManager.AppSettings["app:Name"];
private static readonly string appVersion = ConfigurationManager.AppSettings["app:Version"];
private static readonly string mipData = ConfigurationManager.AppSettings["MipData"];
private readonly string mipPath = Path.Combine(AppDomain.CurrentDomain.BaseDirectory, mipData);
try
{
SharePointContext spContext = SharePointContextProvider.Current.GetSharePointContext(HttpContext);
Uri sharepointUrl = new Uri(spContext.SPHostUrl.AbsoluteUri.ToString());
//fetch tenant id to be used in getting access token
string tenantId = TokenHelper.GetRealmFromTargetUrl(sharepointUrl).ToString();
// Set path to bins folder.
var path = Path.Combine(
Directory.GetParent(Path.GetDirectoryName(new Uri(System.Reflection.Assembly.GetExecutingAssembly().CodeBase).LocalPath)).FullName,
Environment.Is64BitProcess ? "bin\\x64" : "bin\\x86");
MIP.Initialize(MipComponent.File, path);
ApplicationInfo appInfo = new ApplicationInfo()
{
ApplicationId = clientId,
ApplicationName = appName,
ApplicationVersion = appVersion
};
AuthDelegateImplementation authDelegate = new AuthDelegateImplementation(appInfo, tenantId);
var profileSettings = new FileProfileSettings(mipPath, false, authDelegate, new ConsentDelegateImplementation(), appInfo, LogLevel.Trace);
//create MIP File Profile
var fileProfile = Task.Run(async () => await MIP.LoadFileProfileAsync(profileSettings)).Result;
//create MIP Engine and add it to the file profile
var engineSettings = new FileEngineSettings("", "", "en-US");
engineSettings.Identity = new Identity("admin@tenant.com"); //important to paas a valid admin account here
var fileEngine = Task.Run(async () => await fileProfile.AddEngineAsync(engineSettings)).Result;
//client context to get file stream
using (var clientContext = spContext.CreateUserClientContextForSPHost())
{
if (clientContext != null)
{
var list = clientContext.Web.Lists.GetByTitle("Documents");
clientContext.Load(list, i => i.RootFolder);
clientContext.ExecuteQuery();
var listItem = list.GetItemById(1);
clientContext.Load(listItem, l => l.File, l => l.File.ServerRelativeUrl);
var fileData = listItem.File.OpenBinaryStream();
clientContext.ExecuteQuery();
if (fileData.Value != null)
{
var fileStream = fileData.Value;
//create file handler with the stream from SharePoint
var handler = Task.Run(async () => await fileEngine.CreateFileHandlerAsync(fileStream, listItem.File.ServerRelativeUrl, true)).Result;
//if needed, can check the existing labels and protection details using below two lines
var labelDetails = handler.Label;
var protectionDetails = handler.Protection;
LabelingOptions labelingOptions = new LabelingOptions()
{
AssignmentMethod = AssignmentMethod.Privileged, //because I am removing a high priority label
IsDowngradeJustified = true,
JustificationMessage = "Lowering label"
};
handler.DeleteLabel(labelingOptions);
//output stream where new file will be stored
Stream outputStream = new MemoryStream();
var result = Task.Run(async () => await handler.CommitAsync(outputStream)).Result;
//This is neccessary else you will get following error
//Specified argument was out of the range of valid values.\r\nParameter name: bytesToCopy
outputStream.Position = 0;
//You can create a new file handler using output stream here
//and use it to apply different label using newhandler.SetLabel() method
//and then upload it to SharePoint too
FileCreationInformation decryptedFile = new FileCreationInformation();
decryptedFile.ContentStream = outputStream;
decryptedFile.Url = "decrypted.docx"; //change this according to your need
decryptedFile.Overwrite = true;
var uploadedFile = list.RootFolder.Files.Add(decryptedFile);
clientContext.Load(uploadedFile);
clientContext.ExecuteQuery();
}
}
}
}
catch(Exception ex)
{
}
}

Make sure you have registered Azure AD app with proper permissions and your SharePoint App has correct permissions too.

P.S. Please note that MIP SDK does not support content marking (watermark, header, footer). You can apply a label with watermark but it wont be reflected until you open the document and save it in office again. More details here

Happy Coding!

Update November 9, 2019:

Now you can enable sensitivity labels for file present in OneDrive and SharePoint. The feature comes with some new capabilities and some limitations and is currently in public preview. Click here to learn more about this.

Working with C# MIP SDK – I

Recently I got a chance to work with the MIP SDK which is the unification of Microsoft’s classification, labeling, and protection services. Now is the time for data, and its security is paramount for everyone. Microsoft provides some amazing tools to protect our data tenant wide (if you are using O365 Online) or across your farms (in case of on-premises). If you are not aware of the core concepts, I would urge you to read the following links, before jumping to the SDKs.

  1. Azure Information Protection
  2. Office 365 Security and Compliance

The MIP SDK helps you to create custom third-party apps to create, apply, remove labels from your files. It might come handy in cases when you, as a super admin wants to access a protected file, apply labels based on some sensitivity information or even remove labels to check the data. These SDKs are built in C++ and MS provides a C# wrapper over it. There are some good samples provided by Microsoft and they cover a lot of things. But my requirement was bit different. I wanted create a multi-tenant SAAS application which can access these labels. Not only this, it was going to be like a daemon service with no user interaction and hence I needed app-only permissions. Therefore, I used client credential flow to implement this.

Coming back to the challenges I faced:

  1. It took me some time to set up my machine for development
  2. Not much documentation is available for C# and hence I took a lot of time to understand it
  3. The github samples and the test code in the documentation are different. I have to go with code snippets provided in documentation and figure out the rest
  4. Spent some time exploring all the permissions needed and how will they work together for various operations

Here are the assumptions I took from my side:

  1. You have gone through the concepts of File Profiles and File Engines
  2. You already have idea of registering multi-tenant Azure AD app and how it works
  3. You have a basic idea of OAuth and various authorization flow it uses, like client credentials flow

Now coming to the setup of your machine, the exhaustive list could be found here. I am covering the things I did to set up my Windows 10 environment.

  1. Created a demo account which has AIP enabled for trial
  2. Configured few sensitivity labels with various settings in O365 Security and Compliance Center
  3. Make sure your Windows 10 has version 1709 or later
  4. My machine does not have “Developer Mode” enabled but it works
  5. Installed Universal Windows Platform development in VS 2017, which took like 2 hours
  6. Downloaded and installed MIP SDK for Windows
  7. And you are done!!!!!

As our development environment is ready, lets fire up VS (I am using 2017)

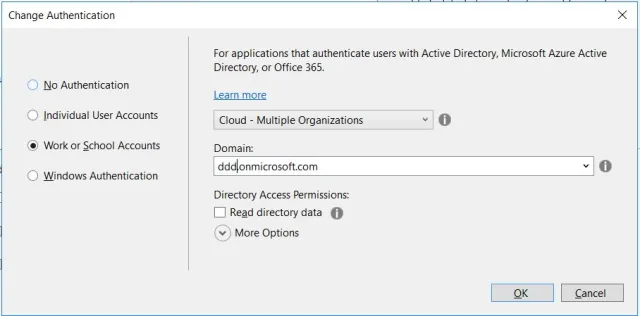
  1. Create new .Net Web Application -> Choose MVC Template -> Change Authentication to “Work or School Accounts” -> “Cloud – Multiple Organizations”. Provide relevant domain and create a new project
  2. This will automatically create a registration in Azure AD with your project name. Login to portal -> Azure Active Directory -> App Registrations and search for the app you created
  3. For demo purpose I am using default localhost Redirect URI created by VS
  4. Navigate to “API permissions” tab and grant the following permissions. Make sure to click on “Grant admin consent” so that permissions are authorized by admin. Notice that all are application permission, except for MS Graph which is used for login
  5. Navigate to “Certificates and secrets” tab and create new client secret. Remember to copy and save it in web.config. This is not a secure practice and in production environment you should use Key Vault to store it securely
  6. Move to the project created in VS and update your web.config with following entries
  7. Install following Nuget in the project: Microsoft.InformationProtection.File and Microsoft.IdentityModel.Clients.ActiveDirectory
  8. That’s it!

You can find the complete source code at my github repo. Below are few issues I faced and how I solved it:

  1. Load Library failed for mip_dotnet.dll : To fix this, you need to provide the path of dll from the app folder. That’s why in HomeController line 41 you can see I have initialized MIP by providing the path
    MIP.Initialize(MipComponent.File, path);
  2. Also make sure to provide proper path while creating File Profile at line 54 as this is the place under which logging, telemetry, and other persistent state is stored.
    var profileSettings = new FileProfileSettings(mipPath, false, authDelegate, new ConsentDelegateImplementation(), appInfo, LogLevel.Trace);
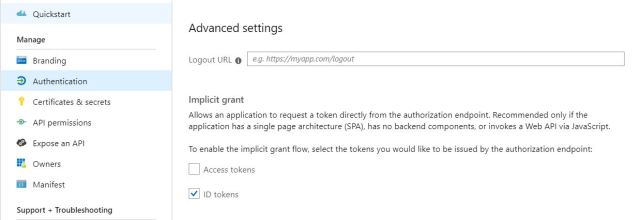
  3. Make sure “ID Tokens” is enabled in AD registered app
I hope this helps in getting started with MIP SDK in C#. I have updated the code to remove protection from a file, you can try other similar operations.

In Part two we will go through using MIP SDK with SharePoint files. To make stuff more interesting, we will implement it in SharePoint Provider Hosted Add-In.

Happy Coding!

Update November 9, 2019:

Now you can use sensitivity labels with MS Teams, O365 and SharePoint Sites. This feature is in public preview. Click here to learn more about this.

SharePoint Saturday Pune

So, I was lucky enough to attend and speak in first ever SharePoint Saturday held in Pune today. I was one of the speaker and spoke on “Why do we need Site Designs?”

Why do we need Site Designs

I would like to thank PUG (Pune User Group) for organising such a great event on a short notice. It was lovely to meet so many SP experts. Thanks Rapid Circle and other sponsors for making it happen. We have #WomenInTech session and sharing a picture with all my colleagues.

#WomenInTech RC People

This post is to share my slide-deck with you all. So anyone who is interested can access the slides on “Site Designs” using below link:

Why do we need Site Designs

Happy Sharing!

Auditing in MVC EF Project

Recently I worked on a requirement to audit the web application for CRUD operations. Yes, all of CRUD that means read operation too. I had a MVC web application which used Entity Framework DB first option and was using Azure AD Authentication. The complete set of requirements (mentioned below) was bit different than normal auditing.

  1. Log one row per table change instead of per property (column) change.
  2. Log for read operation too
  3. Generate a checksum and log it to along with the audit trail
  4. Apart from that, have to log table name, logged in user name, timestamp and other generic stuff

We decided to just store the new (updated) values in the audit trail instead of both old and new ones. If needed, we can get history of that object from audit table so not storing old values was not going to be an issue.

To achieve this, I decided to overwrite the SaveChanges method of DbContext. Entity Framework DB first creates partial classes for everything including the DbContext. I just used partial classes and overrode the SaveChanges method. Before jumping to the code, below is the approach I followed for all of the above points, respectively:

  1. I decided to create JSON of the updated row by using JSON.NET library. I could have used XML too but the issue with XML is, it fails on out of the box generated DB classes due to circular references and use of ICollection and virtual properties. To do this with XML, I would have to create POCO objects, which was just increasing the development time and effort. Hence I decided to use JSON.NET to create a valid json of updated row and store it in varchar(max) field of audit table in SQL. You can go ahead with XML too
  2. By overriding SaveChanges I can audit for create, update and delete (CUD) operation but not for read. Therefore, to simplify the process I just manually added audit rows for every call to functions where I fetch any table’s details. It was straightforward and easy but there was a catch. As I was adding audit row while reading an object, SaveChanges was called and hence for every read operation, there was an entry in audit table which denotes that an entry is added in the audit table. Basically the audit table was getting audited which I did not want. Hence, I have to exclude the “Audit” table manually from code
  3. This was easy to implement. I just combined the complete row using StringBuilder and generated checksum using MD5. You can use any other algorithm too. Besides that I converted the generated checksum to hex to store it in DB, you can use Base64 too
  4. I was using three tier architecture in my project with web layer, service layer and one data layer. Other things are straightforward but for user id I did not want to store complete email address for every row. That’s why, what I did was, I entered logged in user’s email id in database once someone logs in to the application for the first time and at the same time stored that table’s primary key as custom claim. I then read this claim value and use it for audit purpose
  5. Last thing, as I need to audit create operations too and their id is not generated until the call to SaveChanges, I have to collect create entities in different collection and audit them after an initial call to SaveChanges 

So below is the code to achieve all this:


public partial class CustomDbContext: DbContext
{
public override int SaveChanges()
{
// Get all Added/Deleted/Modified entities (not Unmodified or Detached)
//you can get updated and deleted in same collection. I am doing so for ease of purpose
//getting added entries in different collection to fetch their generated ids and then log them
var addedEntries = ChangeTracker.Entries().Where(e => e.State == EntityState.Added).ToList();
var updatedEntries = ChangeTracker.Entries().Where(e => e.State == EntityState.Modified).ToList();
var deletedEntries = ChangeTracker.Entries().Where(e => e.State == EntityState.Deleted).ToList();
foreach (var entry in updatedEntries)
{
ApplyAuditLog(entry);
}
foreach (var entry in deletedEntries)
{
ApplyAuditLog(entry);
}
int changes = base.SaveChanges();
foreach (var entry in addedEntries)
{
ApplyAuditLog(entry);
}
base.SaveChanges();
return changes;
}
/// <summary>
/// code to enter values in audit table
/// </summary>
/// <param name="entry"></param>
/// <param name="auditType"></param>
private void ApplyAuditLog(DbEntityEntry entry)
{
//get table name of entry
string tableName = GetTableName(entry);
//exlude audit table from getting audited
if (!tableName.Equals("Audit", StringComparison.OrdinalIgnoreCase))
{
//code to get primary key (id) of object which is updated
var objectStateEntry = ((IObjectContextAdapter)this).ObjectContext.ObjectStateManager.GetObjectStateEntry(entry.Entity);
int primaryKeyOfEntity = (int)objectStateEntry.EntityKey.EntityKeyValues[0].Value;
DateTime currentDateTime = DateTime.Now;
//code to convert the updated/added/deleted entry to json using newtonsoft json nuget package
string serializedJson = JsonConvert.SerializeObject(entry.CurrentValues.ToObject(), Formatting.Indented, new JsonSerializerSettings
{
//below code ignores the circular references. Main reason XML is not used as this was so wasy in JSON
ReferenceLoopHandling = ReferenceLoopHandling.Ignore
});
Audit auditTrail = new Audit()
{
TimeStamp = currentDateTime,
AuthenticatedUser = {/* code to log authenticated user */ },
LinkedID = primaryKeyOfEntity,
AuditType = {/*create/update/delete/or read. Write your own logic here */ },
TableName = tableName,
NewValue = serializedJson
};
//you can write code here to generated checksum using algo like SHA1, MD5 and then update it in audit trail
//string checksumValue = GetChecksumValueFromTrail(auditTrail);
//write code to add entry in audit table here like below
//Audit.Add(auditTrail);
}
}
/// <summary>
/// method to fetch table name of updated entity
/// </summary>
/// <param name="dbEntityEntry"></param>
/// <returns></returns>
private string GetTableName(DbEntityEntry dbEntityEntry)
{
ObjectContext objectContext = ((IObjectContextAdapter)this).ObjectContext;
Type entityType = dbEntityEntry.Entity.GetType();
if (entityType.BaseType != null && entityType.Namespace == "System.Data.Entity.DynamicProxies")
entityType = entityType.BaseType;
string entityTypeName = entityType.Name;
EntityContainer container =
objectContext.MetadataWorkspace.GetEntityContainer(objectContext.DefaultContainerName, DataSpace.CSpace);
string entitySetName = (from meta in container.BaseEntitySets
where meta.ElementType.Name == entityTypeName
select meta.Name).First();
return entitySetName;
}
}


Power Apps – Get Values from Multi-Select Fields

Most of the times in custom list forms or in web power apps you have a requirement to perform an action based on values selected in a field. It is very straightforward for simple fields like single line of text, number, single-select drop-downs but gets little tricky if the field is multi-select. For example, in a demo application, I want to enter my details along with my hobbies. Let’s say the condition is; if “Reading” is one of my hobby, I need to ask user his/her preferred book format. If not, this field should not be visible. Below post is about achieving this.

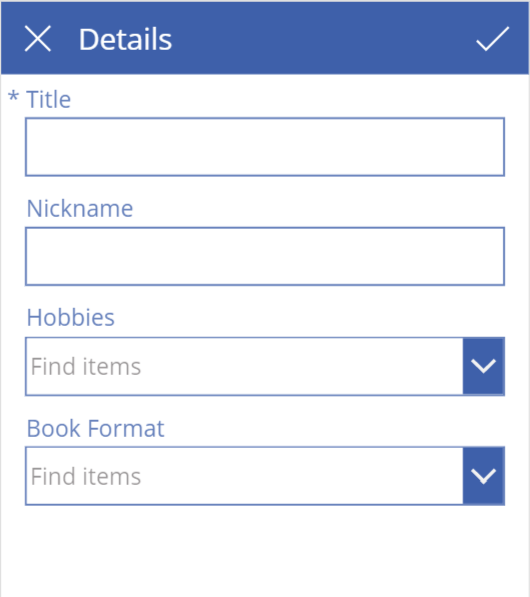
Currently the form looks like this:

I need to display “Book Format” field only when I select “Reading” as one of the “Hobbies”.

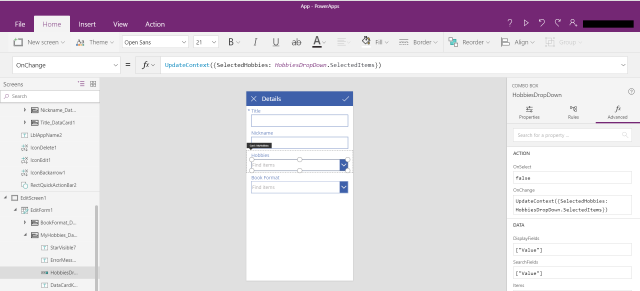
  1. The first logical step is to record the selected hobbies in a variable. We can bind it to the “OnChange” event of the “Hobbies” drop-down. It can simply be achieved by using the UpdateContext function

    UpdateContext({SelectedHobbies: HobbiesDropDown.SelectedItems})The above statement declares a variable named “SelectedHobbies” and set its value to selected items in the drop down list. I have renamed the data card value to “HobbiesDropDown” for ease of use.

  2. The above variable “SelectedHobbies” is of “Table” type. If you are confused, you can confirm the type of variable by selecting the “File” menu item and checking “Variables” section
  3. Now it is just a matter of checking if “Reading” is one of the value in “SelectedHobbies” table variable and then set visible property of “Book Format” drop-down accordingly. To check this, you can use LookUp function present in Power Apps. I used the below query:If(LookUp(SelectedHobbies, Value = “Reading”, Value) = “Reading”, true, false)

    What it says is, if “Reading” is one of the “Value” present in the “SelectedHobbies” table, then set visible property of “Book Format” to true else false. Notice the use of “Value” keyword here. LookUp searches the given collection (first parameter), based on a condition (second parameter) and return the field you want (third parameter) satisfying that condition. In our case, if “SelectedHobbies” collection has Reading as its one of the values, then return that particular value i.e. “Reading”.

  4. That’s it and you are done. Run your application to check.”Reading” not in the hobby list

    “Reading” selected as hobby:

Simple enough. I was going through multiple ways to do it when I stumbled onto the “Value” keyword. I did not find much documentation on this and hence the blog post. Needless to say, same behavior applies to power apps list form too.

Also, you can either replicate the same behavior in View and Edit form or use the Set function to create a global variable instead of UpdateContext which you can use across the app.

P.S. The above will not work for multi-select people picker column. It works for Choice and LookUp fields only.

Hope it helps!

Power Apps – An entry is required or has invalid value

Recently I started exploring Power Apps in more depth. Its a nice tool but not without some issues. My scenario was to create a power app based on a SharePoint list which uses a custom content type. All the fields in the content type were optional. But still when I tried to save the form, it gave classic “An entry is required or has invalid value” exception.

Generally this error means that a required field is missing a value but I have no such fields in my content type. Also, strangely, I was able to save an item using the default new list item form.

Update (July,2018): I tested this again and now even the default list form throws error.

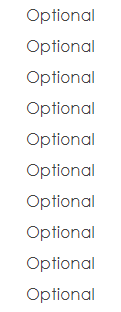
All the fields in the power app has “Required” property set to “false”. All the fields in the custom content type were “Optional” and I had only one content type present on the list.

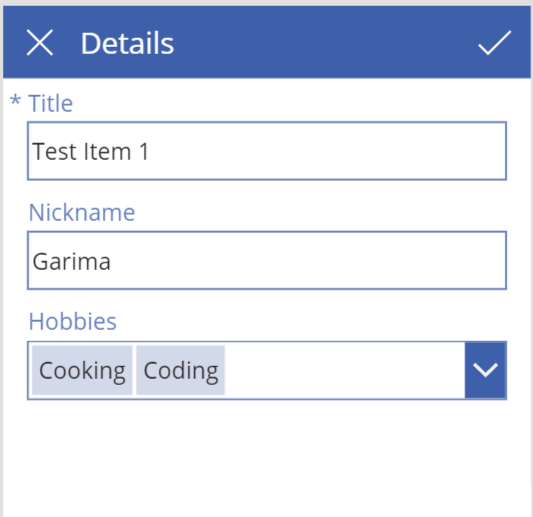
After wasting almost 2 hours on this, I realized that power app, unlike default new list item form, does not take content type “Required/Optional” attribute into account. It gives preference to column settings. So in my case the erroneous field was “Title” column. It was optional in content type but not in column settings.


As soon as I set this to “No” in the column settings, my power app worked perfectly. You might have some other column like this, so please check.

P.S. I encountered the same for Power Apps list forms.

Hope this helps!