This post is in continuation with how to use MIP SDK in C#. Please go through it first to cover some basic concepts like, setting up your system, nuget required for MIP and registering Azure AD app which will be used in the code below too.
My case scenario was to analyze a protected file present in SharePoint Document Library and set/remove protection on it depending on the contents of the document. In case you are not aware, we can use Azure Information Protection or Unified Labeling in SharePoint too. It’s pretty straight-forward and more details can be found here.
In comparison to the code I uploaded on git, there are few basic changes for using MIP SDK in Provider Hosted add-ins. Instead of relying on file path, we will use file stream from SharePoint and similarly, upload that stream back to SharePoint. I am assuming that you all are aware of provider hosted add-ins and have gone through the part one of this post. I am listing the changes below while rest of the stuff remains the same.
- Create a provider hosted add-in using Visual Studio. I have used SharePoint Online and MVC template for my work
- In AppManifest.xml give proper permission to access libraries of your target site collection
- Now coming to HomeController, InvokeMIP method, the first difference is how will we get tenant id of our host web. Instead of finding it in Claims, we will get it using TokenHelper’s method GetRealmFromTargetUrl
- Apart from this, we will create SharePoint context to get file stream of the uploaded file where we need to perform MIP operations
- Using this stream, MIP file handler will be created
- The output will be collected in memory stream
- Output Stream will be used to upload the changed document back to SharePoint (For more details on how to upload large files in provider hosted add-in, check this post here)
The complete code will look like below:
This file contains bidirectional Unicode text that may be interpreted or compiled differently than what appears below. To review, open the file in an editor that reveals hidden Unicode characters.
Learn more about bidirectional Unicode characters
| private void InvokeMIP() | |
| { | |
| //this client id is for Azure AD app and NOT of SharePoint app | |
| private static readonly string clientId = ConfigurationManager.AppSettings["ida:ClientId"]; | |
| private static readonly string appName = ConfigurationManager.AppSettings["app:Name"]; | |
| private static readonly string appVersion = ConfigurationManager.AppSettings["app:Version"]; | |
| private static readonly string mipData = ConfigurationManager.AppSettings["MipData"]; | |
| private readonly string mipPath = Path.Combine(AppDomain.CurrentDomain.BaseDirectory, mipData); | |
| try | |
| { | |
| SharePointContext spContext = SharePointContextProvider.Current.GetSharePointContext(HttpContext); | |
| Uri sharepointUrl = new Uri(spContext.SPHostUrl.AbsoluteUri.ToString()); | |
| //fetch tenant id to be used in getting access token | |
| string tenantId = TokenHelper.GetRealmFromTargetUrl(sharepointUrl).ToString(); | |
| // Set path to bins folder. | |
| var path = Path.Combine( | |
| Directory.GetParent(Path.GetDirectoryName(new Uri(System.Reflection.Assembly.GetExecutingAssembly().CodeBase).LocalPath)).FullName, | |
| Environment.Is64BitProcess ? "bin\\x64" : "bin\\x86"); | |
| MIP.Initialize(MipComponent.File, path); | |
| ApplicationInfo appInfo = new ApplicationInfo() | |
| { | |
| ApplicationId = clientId, | |
| ApplicationName = appName, | |
| ApplicationVersion = appVersion | |
| }; | |
| AuthDelegateImplementation authDelegate = new AuthDelegateImplementation(appInfo, tenantId); | |
| var profileSettings = new FileProfileSettings(mipPath, false, authDelegate, new ConsentDelegateImplementation(), appInfo, LogLevel.Trace); | |
| //create MIP File Profile | |
| var fileProfile = Task.Run(async () => await MIP.LoadFileProfileAsync(profileSettings)).Result; | |
| //create MIP Engine and add it to the file profile | |
| var engineSettings = new FileEngineSettings("", "", "en-US"); | |
| engineSettings.Identity = new Identity("admin@tenant.com"); //important to paas a valid admin account here | |
| var fileEngine = Task.Run(async () => await fileProfile.AddEngineAsync(engineSettings)).Result; | |
| //client context to get file stream | |
| using (var clientContext = spContext.CreateUserClientContextForSPHost()) | |
| { | |
| if (clientContext != null) | |
| { | |
| var list = clientContext.Web.Lists.GetByTitle("Documents"); | |
| clientContext.Load(list, i => i.RootFolder); | |
| clientContext.ExecuteQuery(); | |
| var listItem = list.GetItemById(1); | |
| clientContext.Load(listItem, l => l.File, l => l.File.ServerRelativeUrl); | |
| var fileData = listItem.File.OpenBinaryStream(); | |
| clientContext.ExecuteQuery(); | |
| if (fileData.Value != null) | |
| { | |
| var fileStream = fileData.Value; | |
| //create file handler with the stream from SharePoint | |
| var handler = Task.Run(async () => await fileEngine.CreateFileHandlerAsync(fileStream, listItem.File.ServerRelativeUrl, true)).Result; | |
| //if needed, can check the existing labels and protection details using below two lines | |
| var labelDetails = handler.Label; | |
| var protectionDetails = handler.Protection; | |
| LabelingOptions labelingOptions = new LabelingOptions() | |
| { | |
| AssignmentMethod = AssignmentMethod.Privileged, //because I am removing a high priority label | |
| IsDowngradeJustified = true, | |
| JustificationMessage = "Lowering label" | |
| }; | |
| handler.DeleteLabel(labelingOptions); | |
| //output stream where new file will be stored | |
| Stream outputStream = new MemoryStream(); | |
| var result = Task.Run(async () => await handler.CommitAsync(outputStream)).Result; | |
| //This is neccessary else you will get following error | |
| //Specified argument was out of the range of valid values.\r\nParameter name: bytesToCopy | |
| outputStream.Position = 0; | |
| //You can create a new file handler using output stream here | |
| //and use it to apply different label using newhandler.SetLabel() method | |
| //and then upload it to SharePoint too | |
| FileCreationInformation decryptedFile = new FileCreationInformation(); | |
| decryptedFile.ContentStream = outputStream; | |
| decryptedFile.Url = "decrypted.docx"; //change this according to your need | |
| decryptedFile.Overwrite = true; | |
| var uploadedFile = list.RootFolder.Files.Add(decryptedFile); | |
| clientContext.Load(uploadedFile); | |
| clientContext.ExecuteQuery(); | |
| } | |
| } | |
| } | |
| } | |
| catch(Exception ex) | |
| { | |
| } | |
| } |
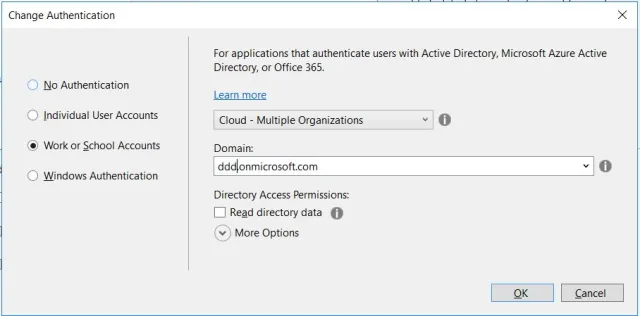
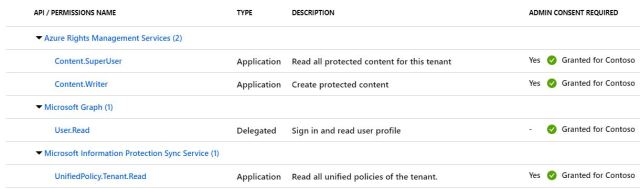
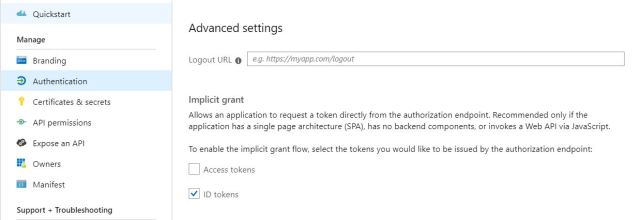
Make sure you have registered Azure AD app with proper permissions and your SharePoint App has correct permissions too.
P.S. Please note that MIP SDK does not support content marking (watermark, header, footer). You can apply a label with watermark but it wont be reflected until you open the document and save it in office again. More details here
Happy Coding!
Update November 9, 2019:
Now you can enable sensitivity labels for file present in OneDrive and SharePoint. The feature comes with some new capabilities and some limitations and is currently in public preview. Click here to learn more about this.