Recently I got a chance to work with the MIP SDK which is the unification of Microsoft’s classification, labeling, and protection services. Now is the time for data, and its security is paramount for everyone. Microsoft provides some amazing tools to protect our data tenant wide (if you are using O365 Online) or across your farms (in case of on-premises). If you are not aware of the core concepts, I would urge you to read the following links, before jumping to the SDKs.
The MIP SDK helps you to create custom third-party apps to create, apply, remove labels from your files. It might come handy in cases when you, as a super admin wants to access a protected file, apply labels based on some sensitivity information or even remove labels to check the data. These SDKs are built in C++ and MS provides a C# wrapper over it. There are some good samples provided by Microsoft and they cover a lot of things. But my requirement was bit different. I wanted create a multi-tenant SAAS application which can access these labels. Not only this, it was going to be like a daemon service with no user interaction and hence I needed app-only permissions. Therefore, I used client credential flow to implement this.
Coming back to the challenges I faced:
- It took me some time to set up my machine for development
- Not much documentation is available for C# and hence I took a lot of time to understand it
- The github samples and the test code in the documentation are different. I have to go with code snippets provided in documentation and figure out the rest
- Spent some time exploring all the permissions needed and how will they work together for various operations
Here are the assumptions I took from my side:
- You have gone through the concepts of File Profiles and File Engines
- You already have idea of registering multi-tenant Azure AD app and how it works
- You have a basic idea of OAuth and various authorization flow it uses, like client credentials flow
Now coming to the setup of your machine, the exhaustive list could be found here. I am covering the things I did to set up my Windows 10 environment.
- Created a demo account which has AIP enabled for trial
- Configured few sensitivity labels with various settings in O365 Security and Compliance Center
- Make sure your Windows 10 has version 1709 or later
- My machine does not have “Developer Mode” enabled but it works
- Installed Universal Windows Platform development in VS 2017, which took like 2 hours
- Downloaded and installed MIP SDK for Windows
- And you are done!!!!!
As our development environment is ready, lets fire up VS (I am using 2017)
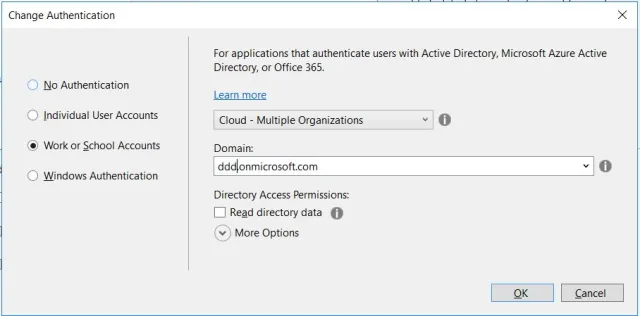
- Create new .Net Web Application -> Choose MVC Template -> Change Authentication to “Work or School Accounts” -> “Cloud – Multiple Organizations”. Provide relevant domain and create a new project
- This will automatically create a registration in Azure AD with your project name. Login to portal -> Azure Active Directory -> App Registrations and search for the app you created
- For demo purpose I am using default localhost Redirect URI created by VS
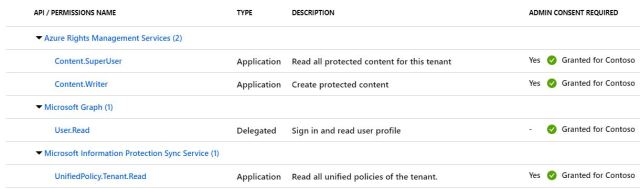
- Navigate to “API permissions” tab and grant the following permissions. Make sure to click on “Grant admin consent” so that permissions are authorized by admin. Notice that all are application permission, except for MS Graph which is used for login
- Navigate to “Certificates and secrets” tab and create new client secret. Remember to copy and save it in web.config. This is not a secure practice and in production environment you should use Key Vault to store it securely
- Move to the project created in VS and update your web.config with following entries

- Install following Nuget in the project: Microsoft.InformationProtection.File and Microsoft.IdentityModel.Clients.ActiveDirectory
- That’s it!
You can find the complete source code at my github repo. Below are few issues I faced and how I solved it:
- Load Library failed for mip_dotnet.dll : To fix this, you need to provide the path of dll from the app folder. That’s why in HomeController line 41 you can see I have initialized MIP by providing the path
MIP.Initialize(MipComponent.File, path);
- Also make sure to provide proper path while creating File Profile at line 54 as this is the place under which logging, telemetry, and other persistent state is stored.
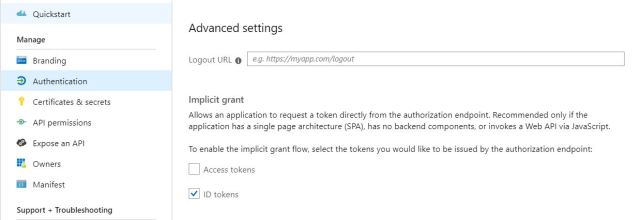
var profileSettings = new FileProfileSettings(mipPath, false, authDelegate, new ConsentDelegateImplementation(), appInfo, LogLevel.Trace); - Make sure “ID Tokens” is enabled in AD registered app
I hope this helps in getting started with MIP SDK in C#. I have updated the code to remove protection from a file, you can try other similar operations.
In Part two we will go through using MIP SDK with SharePoint files. To make stuff more interesting, we will implement it in SharePoint Provider Hosted Add-In.
Happy Coding!
Update November 9, 2019:
Now you can use sensitivity labels with MS Teams, O365 and SharePoint Sites. This feature is in public preview. Click here to learn more about this.
